So today's post is a little different - we're going to do a product review or the Laila dress by Boutique of Molly!
The
sun was back (temporarily), which means cracking out the summer
wardrobe whilst you still can.. (#loveBritishsummer), and what better
way then bringing out the florals to keep that summer vibe alive?
For anyone which knows me, I am a tad bit of a dress-aholic (come rain or shine!), and so I was absolutely thrilled
to pieces last week when I came home from work to find my Boutique of
Molly package had arrived, containing my new Laila dress! As soon as I
opened the package I couldn't to wait 'til the weekend to try it out
(and had my fingers crossed for a bit of sunshine to remain!) It's truly
stunning, and really got me in the summer mood.
Thankfully my
wish came true, and we got that bit of British sunshine so I was able to
wear my beautiful new dress. The first thing I noticed, was the fit of
it - it clung to all the right places, and avoided all the bits I wanted
to hide! I've got a very pear shape body, so a dress cut like this is
perfect for me - it emphasises the smallest part of me (my waist), and
flows out over my hips effortlessly so as not to accentuate them... and
as an added bonus it enhanced my cleavage!
The material of the
Laila dress is really soft too, as well as having a bit of stretch in it
- perfect for when you've had a desert too much (something I do more
often than not!). The bright pink and purple flowers are really
eye-catching, but not too in your face - the perfect balance to get you
noticed, but pointed at!
This really is a wonderful dress, and
definitely going to be an icon of my summer this year - bring back the
sunshine so I can keep on wearing this!!
For more clothing from Boutique of Molly, make sure to check out their website here - they've got some gorgeous pieces available ready for the summer, and at great prices too!
Check out my #BOMselfie below, and make sure to keep your eyes peeled for my newest video being uploaded shortly...
It's with great apologies that I post this product review - I had this all written out and ready to go months
ago, and thought I had uploaded it... but checking through last night I
realised that wasn't the case and it seems to have got missed! So
absolute apologies for that!
Dr Lipp sent me their wonderful
creation which is 'Original Nipple Balm for Lips' to try out, and I was
completely amazed with what you can do with it!
'Original Nipple Balm for Lips' - yes, that's right Nipple Balm
- it's one of them titles which the 14 year old in me giggles at inside
whenever I say it out loud; it just doesn't sound natural for me to
announce I'm using a nipple balm on my lips! It's also one of them names
which makes people do a double take (good marketing their guys!) - so
it tends to stick out in your head. But don't be put off by the name -
this little beaut of a product is actually awesome for more than what
you might be thinking...
Lip Balm - This is the most obvious use -
using a product which says in the description 'for lips', but I just
wanted to explain how marvellous this little gem is. The texture of the
product is very much like nipple balm (being a mother, I have had the
joys of having to use this) ...I presume this is why it has it's name!
But this isn't a bad thing - nipple balm is silky smooth and glides on
easy - it has a soothing touch to it and is a brilliant barrier; which
is exactly the case for this lip balm. When you've got the product on
your lips feel hydrated, and completely protected - like having a drink
is not going to wash the product off so you have to keep reapply every 5
seconds (let's face it, we've all had that kind of lip balm before...).
If you're like me where I suffer from having dry cracked lips on a
daily basis, then this is a little tube of miracle that you need to try out!
Lip
Gloss & Primer - Due to the high shine of this product, it makes
for a perfect long-lasting lipgloss! Simply apply over the top of
lipstick (or naked lips) and get a glossy glow to your look! The best
thing is how little of the product you have to use for this, which means
your little tube will keep on lasting! You can also use the balm before
applying lipstick as a great primer - it flattens out any flaky skin so
that when you apply your lipstick on top it glides on with ease.
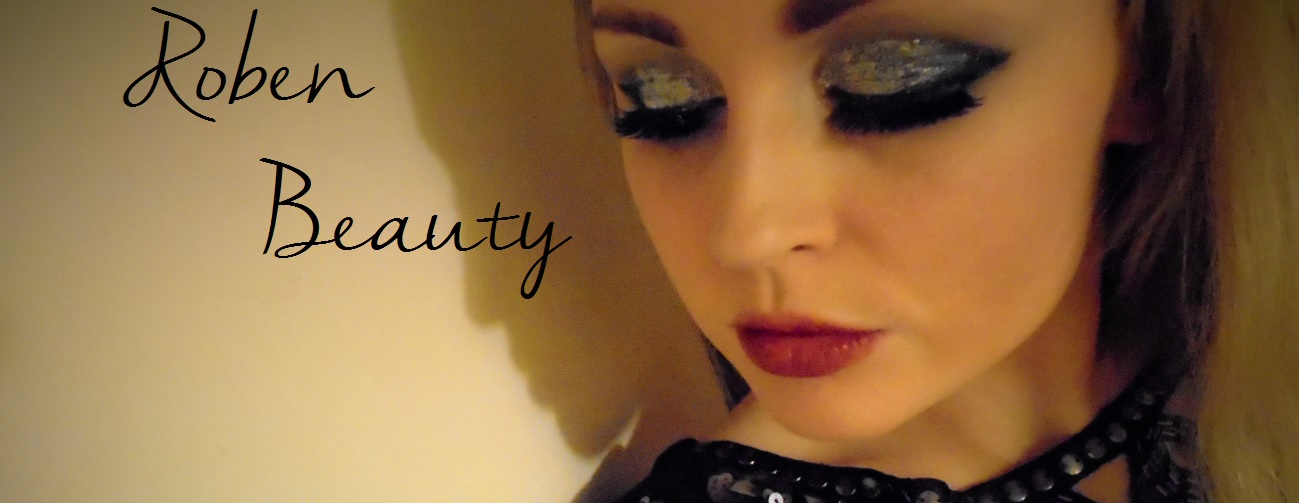
Eye
Shine & Glitter - Yes, eye shine! You must be thinking I'm mental,
but this product is absolutely fantastic for changing a look and jazzing
it up! Apply your eye make-up as usual, then put a small amount of the
Nipple Balm for Lips on top, and you get a complete new look (perfect if
you are going out straight from work - changing the look from a day to
evening in an instant without having to remove make-up or carry round a
million products to do so!). If you want to sparkle up your eyes, this
is also the perfect product to do so - layer on a small amount of the
Nipple Balm for Lips, then pad on any eye glitter - it instantly sticks
to the balm and holds for a good duration of time. As an FYI, this is
exactly what I did for the picture in my header of the website!
Cheek
Shine/Highlighter - If you want to add a bit of shine to your
cheekbones to give that highlighted effect, this product is great.
Again, a small amount ages a long way, so only the tiniest needs to be
applied.
Sore Patches - I know, I know, attractive right? But
let's face it, we all get sore or itchy patches on our faces sometimes
and it's a nightmare when you do (particularly if it then makes red
blotchy patches...). I've used Dr Lipp's Nipple Balm for Lips when I've
had a cold and my nose got sore from constantly blowing it (you know
that red raw look I'm talking about..) - it really soothed the skin and
stopped the irritation; at times like that, it's best to keep the skin
around your nose hydrated so it doesn't dry out and get so sore... which
is exactly what the balm did! I've not had to try myself, but from what
I've heard, you can also use this product on dry/sore patches of skin,
and of course, on nipples themselves when they get cracked and sore.
There are many many many
more other uses for Dr Lipp's 'Original Nipple Balm for Lips', and so
many benfits from using it - if you want to read more about the product
then head over to Dr Lipp's website.
Overall,
I was super impressed with the 'Original Nipple Balm for Lips' - the
packaging is awesome and so pretty! (Simple things, I know!), it's
fabulous for lasting you ages, and there are so many ways you can use
it! Plus, it really helped my dry lips!
I must just start by saying a massive apology for my recent absence from the blogging world! I've had a few things crop up that needed my attention, but I should be back on my game again now!
So, as promised, this little post is all about colour corrections!
I think colour correcting is one of them subjects which not enough of us talk about - it's kind of half assumed we all know what does what, but in reality very few of us can identify the right colour correcter to use for problem skin... let's change that :)
Let's quickly cover a couple of basics...
Always use colour correctors after primer but before foundation - primer is always a must before any kind of makeup, and applying a colour corrector after foundation will be too pigmented and obvious.
Generally pale colours for pale skin, and more pigmented colours (sometimes paired with other correctors) for darker skin tones.
Know your skin! If you can't identify what needs correcting you could end up using the wrong product!
Colour correctors are not concealers - concealers cover up blemishes (spots etc), whereas colour corrector neutralise your skin tone. Colour correctors should be applied before foundation, but concealers are usually applied after foundation.
So let's look at the colour wheel - fundamentally this is your go-to-guide, and it takes seconds to learn! Quite simply, whichever colour issue you are having, look across the other side of the chart, and this will neutralise the colour! I'll go in to more detail below...
Yellow/Sallow Skin - This type of skin is most common in Asian ethnicity, but can be apparent in most skin types (or can also appear if you are feeling unwell); to correct any sallowness/dullness in the skin, apply a purple/lilac colour corrector to the area. If you have light skin then stick with the lilac colour on it's own (a more lavender-like shade), however if you have a darked skin tone, use a darker, more pigmented purple - you may also find that you will have to pair this with a dark peach/orange corrector, as the purple on its own may not be pigmented enough to conceal skin you are correcting (dependant on how dark the skin is).
Blue Skin/Dark Circles - We all get dark circles under our eyes from time to time (too many parties, children, or just stressing out), and for others, they just have that blue-tinged colour patched of skin naturally (generally found around the eye area). Dark circles can be an absolute pain to cover up with foundation on its own - the blue colour still shines through! To balance this out, use an orange colour corrector - this will take away the blueness and will even out your skin tone... don't worry, using an orange colour corrector will not turn your foundation orange too! Again, with darker skin make sure to use a more pigmented orange, whereas with pale skin use a pastel tone.
Grey Skin - Similar to dark circles , but without the bluish tinge - this is usually found on more mature skin, but can occur at any time. To colour balance grey skin, use a yellow colour corrector (a banana-like colour is most popular) - if you have darker skin you may need to balance this out with another peachy coloured colour corrector as the yellow on it's own may not be strong enough.
Red Skin - Probably the most common type of 'problem' skin! Most people get red patches at some point, and anyone with sensitive or thin skin will definitely know all about getting redness in the skin! This is something I sometimes get because I have borderline sensitive skin! It's one of them things that you can apply copious amounts of foundation too and you still have patches where the redness shines through - it's rather irritating! So to combat red skin, make sure to use a green colour corrector - this neutralises the red perfectly and really gives a more balanced skin tone after your foundation is applied. As with the other skin tones, make sure to use a pastel colour for fair skin, and darker pigmented colours for darker skin.
There are so many different types of colour correctors you can get on the market - from palettes, to creams, to sticks, to colour correctors combined with primers! I tend to use a palette so that I can target specific areas as they appear, but I will be doing a comparison piece not too far in the future to try out what the best correctors are!
I hope this piece has been helpful to understand colour correcting, however if you have any questions then please don't hesitate to ask - I'm always happy to help!
I'm super excited to say that my next post is going to be another product review (seeing as I haven't done one in a while) - it's one really not to be missed, so make sure to keep updated (my Twitter and Facebook pages are a great way to keep posted on what's coming up next!).
Just a quick blog as the sun is out today, and I'm feeling the summer vibes coming on! But let's not get too ahead of ourselves; let's appreciate spring first! The flowers are blooming, the trees are sprouting their leaves, and the world just seems to be a happier, sun shining kind of place right now :)
So with the spring theme in mind, I put together another little video ...but this time with a hint of colour! After all, it's so easy to slip into the same old habits; using the same colour palette and the usual black eye liner... sometimes it's good just to mix it up a bit!
This is a daytime look so nothing too drastic, but I hope you enjoy!
So what better way to start the
weekend, than a quick post on how to get flawless looking skin? Because,
let's face it, we all want to look fabulous - especially at the
weekend! So how to achieve it? Read on and find out for yourself...
First
of all, it's not all about the products - I love a good designer
foundation as much as the next girl, but as long as your products are
half decent and they match your skin tone then you'll be fine - it's all
in the application! When you apply your face products in the below
technique, you'll be pleasantly surprised just how easy it is to have
flawless looking skin, without having to splash out on the big bucks.
1 - Primer - always, always, always make
sure to prime your face first! Primer smoothes your complexion and
evens out your skin texture - I'd always recommend it for every makeup
application, but it is most certainly a must when going for a flawless
finish! Put a small
amount on the tips of your fingers and rub together, before applying
all over your face - don't overload yourself with primer (easily done),
or you can make your face look a bit greasy and foundation won't sit
properly on your face!
2 - Foundation- Match
it. Don't guess a shade and think 'that'll do', and whatever you do,
don't choose a darker shade to make yourself look tanned - it will give
you a tide-mark on your jawline, look fake, and just doesn't look all
too pleasant (remember, if you want to look tanned, use a tinted
moisturiser or go to town with the bronzer, don't up the shade of your
foundation!). There are plenty of makeup counters which will match your
correct shade for free, and if you don't fancy that you can always try
some on in the shop before buying (try to test on your face as your
hands might be a different shade so you'll end up mismatching
otherwise!). As for the application...
Use a foundation brush and
put a small amount on to the tip of the brush; start from the centre of
your nose and blend outwards. Your nose is the focal point of your face
so it is important to have an even coverage here. Make sure to keep
starting from the nose when you add more product, and just keep blending
out - blend, blend, blend!
When applying to the cheeks, make one stroke across the cheekbone, the blend down
the face - it is important to always apply with downwards motions as
this is the directions of the hairs on your face; this will create a
more flawless look to your foundation and reduce brush marks which need
further blending.
Apply a tiny amount of product to the chin area, again using downwards strokes, and then to the forehead.
If you want a fuller coverage, go over the face again, and build it up in layers.
3 - Concealer
- Again, the major need for concealer is to make sure it matches your
skin tone; if you have a warm skin tone, then use a warm concealer - if
you have a cool skin tone, use a cool concealer! Apply a small amount on
to a concealer brush (or a foundation brush if you don't have one, but
I'd recommend getting a concealer brush as it really helps with the
control when applying concealer), and then apply under the eye area -
once more using downward strokes. Apply to any blemishes which also need
concealing, but remember not to overload your brush - if you need more,
then layer it up.
I always recommend to apply concealer on your
eyelids for a nice even base (this is, of course, if you are not using
an eyeshadow base or eye primer instead) - it evens out the look of the
eyes and hides any broken capillaries.
If you need to use a colour
correcter at this point then this is the point - I've used a 'banana'
shade concealer around my eyes (by the inner corner and slightly
underneath) - this is because I have grey-ish looking skin here and the
yellow colour balances this out nicely.... I will shortly be writing a
post on how to use colour corrections correctly soon, so if you need
help on this then don't worry I'll be able to help! (Follow me on Twitter and Facebook to keep up to date when I will be uploading a new post/video!).
4 - Setting Powder
- Use a translucent setting powder to set your face. As a quick tip - a
translucent powder can be used on any skin tone; from the palest of the
palest to the darkest of the darkest! Don't be put off by its pale
appearance!
Apply a small amount to one side of your brush and dab
gently around the face. Blend out all of these areas with your brush
using light, circular motions.
Already you should be seeing the difference in your look and the base of the flawlessness should be apparent! 5 - Bronzer/Contour
- To contour use a bronzer which matches your skin tone - again, this
can be sourced by any makeup counter, or just by testing some out in the
shop - don't just reach for the darkest shade and hope for the best!
Apply
along the cheekbone, starting from the hair line and brushing down,
then blend out, once again using downwards motions to follow the hairs
on your face. To get a deeper contour just layer up!
Shade around
the hairline, either side of the nose (if you want to slim your nose
down), and for a fuller looking lip, brush above the chin lightly. If
you're like me and have a wide jawbone, then you can trim this down
with a few added strokes on the widest part of your jawline!
6- Blush
- For the flawless look you want to have a natural looking blush -
nothing to in-your-face and bright (you don't want the attention drawn
to your cheeks, you want an overall flawless finish!). Soft shades are
best for this.
Brush along the cheek bone gently, then smile to
reveal the apples of your cheeks, and apply in circular motions - this
will give you a really nice, healthy glow.
7 - Illuminator -
If you really want flawless skin you need to accentuate and highlight
parts of your face - add a bit of glow and you'll really have that
immaculate looking finish. I like to use pigment shades rather than a
pre-bought illuminator - these are fantastic little pots which can be
use all over the face, and give an iridescent glow to eyeshadow.
Using the tiniest
amount of product, brush over the tops of your cheekbones (believe me,
with pigments, a lot goes an awful long way!) - better to top up than
have to try and remove excess product!
Highlight your chin, cupids
bow, nose and T-zone area - this will really draw attention to the
centre of the face (also another reason why good coverage with the
foundation on your nose is essential!).
...and you're all done!
So
there you have it - my 7 steps to flawless looking skin! This look is
really photogenic, and you'll soon find yourself using it on a daily
basis so that people ask "how does she do it??" I've attached a video
below to show you me putting the words into action, and proving it
really does work!
As always, keep me updated with your responses and check me out on social media for more updates of new posts!
Today I thought I'd do something a bit different - instead of talking about how to put make-up on, let's talk about how to take it off.
Sounds simple? Well I guess it is, but the truth of the matter is that we're never really taught how you should be removing your make-up - 9 out of 10 of us will just grab a wet-wipe and scrub away (which, by the way, is exactly what I used to do!). Realistically, we just do what we can to get it off, and don't think about what it's doing to our skin; we might slap a bit of moisturiser on, but the question is whether that's enough?
After many many years of using make-up wipes (some of which weren't even make-up wipes, they were baby wipes because they were always readily available... if you're a mum, you'll know what I mean!), I soon discovered that they really are not the answer when it comes to removing make-up - they're harsh on your skin (even the 'sensitive' ones), and can actually be the cause of sensitive skin if used on a long term basis! It was this fact which got me to stop using them right away!
So what is the answer? Cream, cream, cream (and a bit of toner)!
I've made a quick video of me removing my make-up how I've been taught to do professionally on others (though slightly adapted as you just can't get the hand angles when using the techniques on yourself!) - and below I have listed everything I have used, and most importantly, why.
Please note - I have used all Simple products as I absolutely love their range, and because they use no nasties it is suitable for my generally sensitive skin - you can use any brand you wish, Simple is just my preferred choice!
Eye-Makeup Remover - Kind to Eyes Nourishing Eye Make-up Remover Cream by Simple - Squeeze a decent amount between two cotton pads and pad together to spread the cream evenly. Hold one of the pads between your fingers and place over the eye, rocking gently in a horizontal motion - do this for a few seconds so that the eye-makeup remover can start to breakdown the eye makeup (particularly on heavy eyeliners and long-wear mascaras). Then wipe the makeup in downward motion - never swipe to the side - this will drag the skin and encourages wrinkles! Keep doing this until the pad has removed majority of the makeup, then fold the pad in half (so the clean side is on show and the makeup side is tucked under) - repeat the downward motions to pick up any excess makeup. Finally, fold the pad in half again (dirty side in, as before), open your eyes and look up - run the pad underneath the eye going from outer corner to inner corner - this will collect up any fallen makeup as well as any eyeliner on the lower lash-line. Repeat this process using the other pad, on the other eye.
Eye-Makeup Remover - Kind to Eyes Nourishing Eye Make-up Remover Cream by Simple - Again! This is for the lips this time... and yes, you just read that correctly - for the lips. Using a small amount on one cotton pad, place between your fingers and hold over your lips - rock backwards and forwards to remove any lipstick and eyeliner. This is particularly effective for removing any lip-stain or long-wear lipsticks which otherwise are a nightmare to remove! It's also really gentle on your lips and helps to keep moisture in.
Cleanser - Kind to Skin Purifying Cleansing Lotion by Simple - This is the main step to removing your makeup, so make sure you have a good cleanser which suits you as you'll be using it a lot! There's quite a few steps for this one so I've broken it down a bit, but once you've done it a few times, you'll be able to do it in your sleep!
1 - Take a big dollop on your hands and rub them together so that the cleanser is visible all over your hands. Gently place your cleanser covered hands down your face - starting on your forehead, followed by both cheeks, then your chin, and finally on your neck.
2 - Use continuous upwards motions on your neck and under your chin and jawlines - this will remove any makeup which is on your neck.
3 - Run your middle finger around your chin and under your bottom lip - this will dislodge any makeup which has got stuck in the crease above your chin (a common place to get spots if not cleaned properly!).
4 - Make scissor motions along your jawline, going from side to side. This is a bit more tricky to do, and it can take a bit of practice before it starts to feel natural, but it's a really good technique for getting rid of any tide marks and foundation lines. (The video shows you how to do this better than I can describe in writing!)
5 - Run your both your middle fingers on either side of your mouth - going above your top lip, then back round to underneath your bottom lip.
6 - Using your middle and ring fingers, make small circular motions around the tip of the nose and both nostrils - this is great for dislodging any makeup that may have settled in the crease around your nose (another spot-prone area if you're not careful).
7 - Again using circular motions, but this time a lot bigger and more relaxed, move your hands down under your cheeks, up on to the cheek bones, and then back down towards the nose, in an almost triangular move.
8 - Run your middle and ring fingers, one after the other, over the top of your nose and up between your eyebrows - this move not only helps remove makeup, but feels really relaxing!
9 - Go back to the scissor movement you did on the jawline, but this time run your hands across your forehead, going from temple to temple - this will remove any makeup from around your hair line, as well as any makeup on or around your eyebrows.
10 -Finally, grab some tissue and gently swirl around your face to remove the makeup - you'll be shocked how much comes off!
Do this routine again (always cleanse twice!), and if you have quite a lot or a heavy load of makeup then go over a third time.
Toner - Kind to Skin Soothing Facial Toner by Simple - Toner is really important - by cleansing your face and getting really deep into them pores, you have to disrupt the balance of your skin, so toner is essential after cleansing as it restores your skin balance back to how it should be. Pore a decent amount between two pads and press together to spread evenly - you want a fair amount on, but if the pad is soaked through then you've got too much! Gently run both pads over your face starting from the centre outwards. Grab a sheet off tissue and dab any excess toner off so as to make sure you don't look shiny!
Moisturiser - Kind to Skin Replenishing Rich Moisturiser by Simple - A girl's best friend! Even if you're not doing the full routine, it is super recommended that you use a moisturiser daily - it hydrates your skin and creates an amazing base before applying your makeup, as well as when you remove it. Squeeze out a fair amount between two cotton pads and press together to spread evenly, then run both pads over your face, starting from the centre outwards; just like you did with the toner.
You'll find that after doing this routine your skin feels amazing! It doesn't feel tight or irritated, and it's not bright red either (which is exactly what mine used to go when I used wipes on it!). It can be a bit of a long winded routine, but once you get yourself into it, it becomes second nature and you really do start to see the benefits! It's also a great skincare routine to use even if you're not wearing makeup that day (just minus the eye-makeup remover), and can be really relaxing if you've had a stressful day - why not teach your partner how to do it, and it feels just like a massage!
Give it a try and tell me all about your experience - I love getting your feedback and know I am being helpful!
As a blogger myself, I love having a good scout round for ideas and
inspiration, and it's on a recurring basis that I come across the terms
'Quick' 'Easy' and 'Simple'.... followed by then a really complicated
step-by-step guide which you end up getting lost in, resulting in giving
up and accepting your attempt does not look anywhere as good as the
beauty telling you how to achieve it. It's down-heartening, and makes
you feel like only the pros can really get to grips with that look. As
you all know, I'm all about beauty-positivity, and so I decided to put
together 3 looks which genuinely are easy to get to grips with!
Everybody
loves a classic look - it's clean, it's simple, and it goes with every
outfit! This look was achieved with the following;
Primer - everywhere, all the time - never forget the primer as it sets the base for your face
Foundation
- applied all over, topped with a bit of concealer under the eyes and
around my nose area (this is because I get redness here, so feel free to
miss this bit if it doesn't apply to you!). I then set the whole face
with a translucent powder; I've only used a setting powder at this stage
as my contouring and blush are both powders so will set better on top -
if you are using cream on liquid based blush/contouring products then
apply your setting powder afterwards.
Contouring
- This look has the deepest contour out of the 3, but it's still fairly
subtle - for this I used my BarryM Contour Kit (just the dark contour
part - no bronzer) marking the underneath of my cheek bones. I topped up
with some highlighter under my eyes, on the T-zone, down my nose, and a
tiny bit on my chin.
Blush - applied lightly across the cheekbones
Eyebrows - drawn on into an arch with Beauty UK's Brow Kit (I'll be doing a separate tutorial for this so keep tuned!)
Eye-shadow
- A light nude-based colour applied all over the lid, followed by a
light brown applied to the outer crease line only (blend it in to give a
softer look)
Eyeliner - A nice bold line running
the length of the eyelid, and finishing with a small upwards flick.
Drag a tiny amount down under the bottom waterline to make the eyes
appear larger.
Mascara - As long as it's black, it will do. Nothing fancy required here.
Lipstick
- The main focus of this look - make it red, make it bold. Apply lip
liner first if you want to make your lips appear larger, or to get a
smoother finish, otherwise hit it up big and draw some attention to
yourself!
Because
sometimes, we all need to vamp up our outfit with a splash of colour -
why not try this look for a little bit more oomph to your look!
Primer & Foundation - the same as in The Classic
Contouring
- A bit less contour is required for this look - just a light brush of a
bronzer under the cheeks bones and a dash of highlighter on the T-zone
and down the nose.
Blush - More blush in a rose shade applied several times to the cheeks to get a nice glow, as well as to frame the face.
Eyebrows - drawn on into an arch with Beauty UK's Brow Kit (I'll be doing a separate tutorial for this so keep tuned!)
Eye-shadow
- This is where the colour starts to come in! I started off with a pale
blush across the whole eyelid as a base, followed by a smokey blue to
line the crease and outer corner of the eye. Finally I used a dark blue
to go over the corner of the eye - blend this in with a brush using
sweeping motions to get a nice smokey feel.
Eyeliner
- To step away from the usual black eyeliner, I went for a metallic
blue - this was a nice chunky line that ran across the lid and joined up
with the eye-shadow to give a more defined point to the eye. Using this
metallic eyeliner meant that it blended nicely into the eye-shadow and
also gave the eyes a bit of shimmer and colour.
Mascara - Once again, as long as it's black, it will do. Nothing fancy required here. Lipstick
- Something subtle; the main focus for this look is the colour on the
eyes, so go for a natural pink shade or just a bit of gloss (like I have
done).
The Natural
A
refreshingly clean look which enhances your natural beauty. This does
wonders for your self esteem, and gets people wondering how you look so
effortlessly beautiful.
Primer & Foundation - the same as in The Classic
Contouring
- No contouring is required for this look - just add a bit of
highlighting to under the eyes, the T-zone, along the nose and on the
chin.
Blush - A small amount of blush in a light colour, just to give the face a bit of shape - but nothing heavy.
Eyebrows - drawn on into an arch with Beauty UK's Brow Kit (I'll be doing a separate tutorial for this so keep tuned!)
Eye-shadow
- Use a nude shade on the whole eyelid - I've used a light bronze
colour to give a natural shimmer look. Shape the eye starting from the
inner corner sweeping out, with a light brown shade - make sure to blend
this in well so it doesn't look drawn on; this is a very natural look
so keep everything well blended.
Eyeliner - Use a brown eyeliner on the upper and lower water lines - use very sparingly, as again this needs to look very natural.
Mascara
- This time using a brown mascara - as I'm blonde, it's very obvious if
I have black mascara on that I am enhancing my eyes - using a brown
mascara keeps it looking natural and light, and doesn't focus the
attention just on the eye area of my face.
Lipstick
- No lipstick, just a bit of balm - I've used Dr Lipp's 'Nipple Balm
for Lips' - it's brilliant for hydration and gives a bit of shimmer.